Analysis of Pattern Application #3:
According to Nakamichi (2011, p. 62), this bodice pattern allows a knot to “become a natural part of the garment.” Therefore, I replicated “inserting a knot into the bodice” just as Nakamichi did (2011, p. 62).
Applying the “knots” technique
NOTE: I found that all the measurements that Nakamichi gave in her book (2011, p. 62) need to be divided in half in order to create the half scale pattern. The given measurements are evidently for a full scale pattern.
Step 1:
Create the “knots” pattern using a Nakamichi bodice front right sloper with one armhole dart and two waist darts.
- This Nakamichi pattern technique uses pattern principle #1, dart manipulation.
- The basic principles of this pattern are those as described by Joseph-Armstrong (2010, p.73) as dart manipulation or more specifically a dart equivalent, a styleline (2010, p. 122).
- In my opinion, the basic rules of this pattern are to use dart equivalents or stylelines to create a new design. I feel that Nakamichi uses the traditional methods employed by Joseph-Armstrong for dart manipulation. These rules allow Nakamichi to achieve the pattern manipulations that she needs in order to build a foundation for her “knots” design.
- I think the rules of this pattern hold true. In this case, one of the stylelines had to go through the bust in order to manipulate and close the armhole dart to create a new pattern style.
- I would say that traditional rules of patternmaking are true for this pattern. Nakamichi uses the traditional techniques for dart manipulation or stylelines (Joseph-Armstrong, 2010, pp. 73 and 122). I do not believe that any pattern rules have been broken in the development of this pattern.
According to Nakamichi (2011, p. 62), this bodice pattern allows a knot to “become a natural part of the garment.” Therefore, I replicated “inserting a knot into the bodice” just as Nakamichi did (2011, p. 62).
Applying the “knots” technique
NOTE: I found that all the measurements that Nakamichi gave in her book (2011, p. 62) need to be divided in half in order to create the half scale pattern. The given measurements are evidently for a full scale pattern.
Step 1:
Create the “knots” pattern using a Nakamichi bodice front right sloper with one armhole dart and two waist darts.
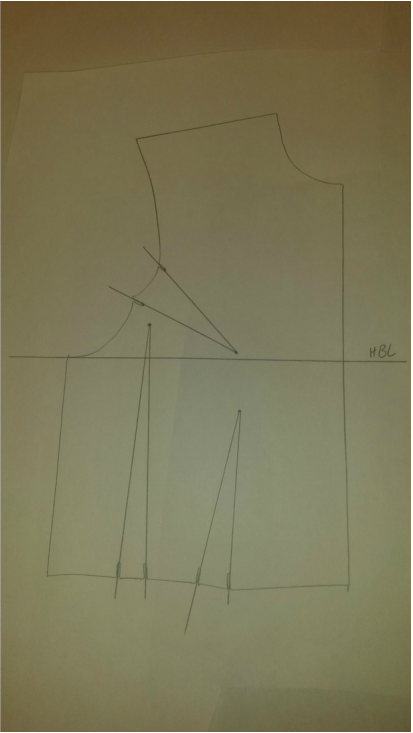
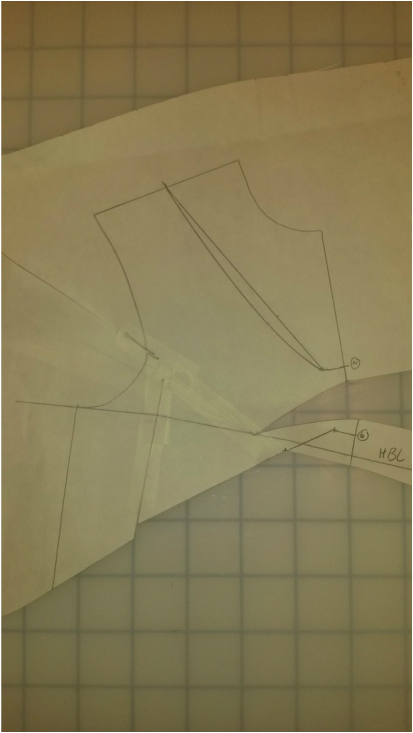
Step 2:
Mark the center point of the shoulder seam.
Mark a point ½ cm below the HBL on the center front line.
Mark another point ½ cm below the HBL and 3 cm over from the center front (vertical) line.
Mark a point 1 cm above the HBL on the center front line and mark it as point “b.”
Mark a point 1 ½ cm above point “b” and call this point “a.”
Mark the center point between point “a” and point “b.”
Step 3:
Draw a line from the center point of the shoulder to the 1 cm mark to the left of the center front line and level with point “a.”
Draw a line connecting the ½ cm mark on the center front line below the HBL and the ½ cm mark ½ cm down from the HBL and 3 cm to the left of the center front line.
Next draw a line extending from the point of the 3 cm end point mentioned above and through the top of the nearest waist dart continuing on to the side seam. (NOTE: the top of the waist dart is literally the top, which is ¼” above the drill hole in this case.)
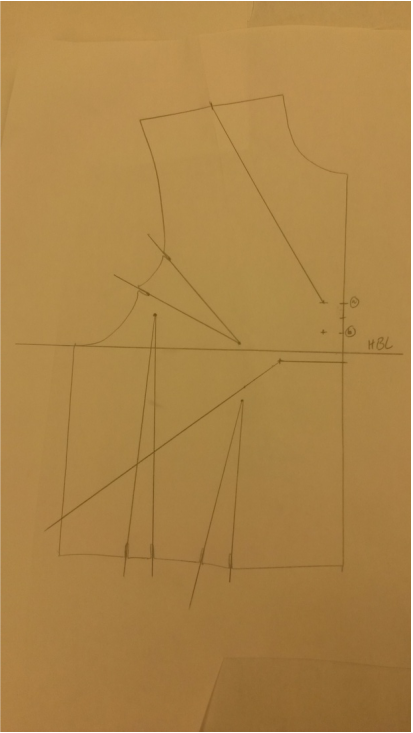
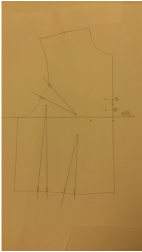
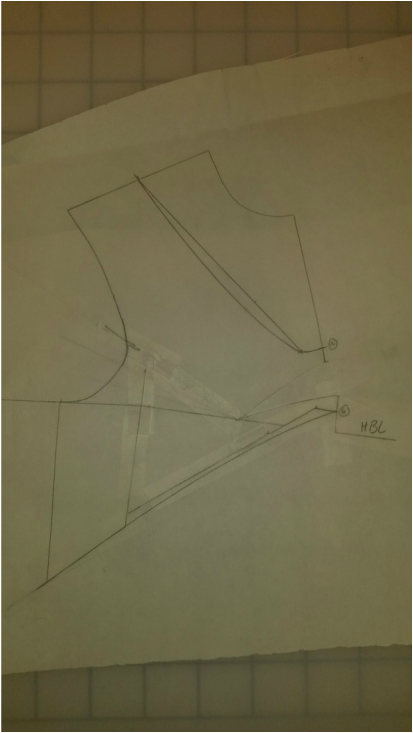
Step 4:
Continue the line (that goes through the dart and down through the side seam) upwards to the 1 cm mark up from the HBL and 1 cm to the left of the center front line. Then connect (with a line) this same point to point “b.”
Make a mark approximately 2/3 of the way down the line extending from the center of the shoulder. Measure ½ cm to the left of this line at this mark. Use this new mark and a hip curve to reshape the line extending from the shoulder.
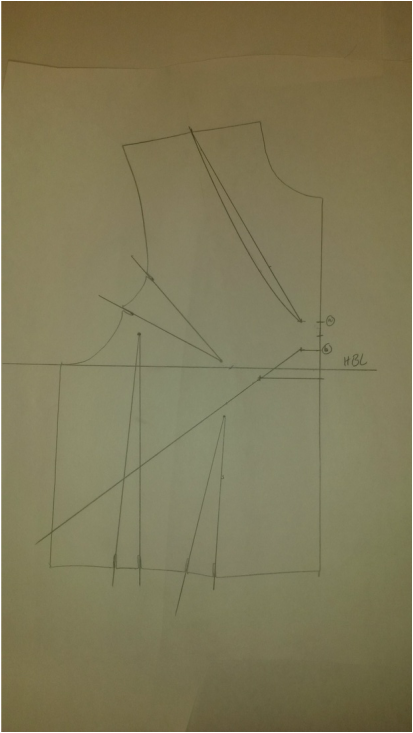
Step 5:
Extend the curve of the above line from the 1 cm point to the left of the center front point until it meets point “a.”
Using a hip curve, draw a slightly curved line from the armhole dart top to the point marked on the center line between points “a” and “b.” NOTE: I had previously backed the dart point away from the bust point, so for this exercise, I had to find the center of my dart and extend is once again to the bust point.
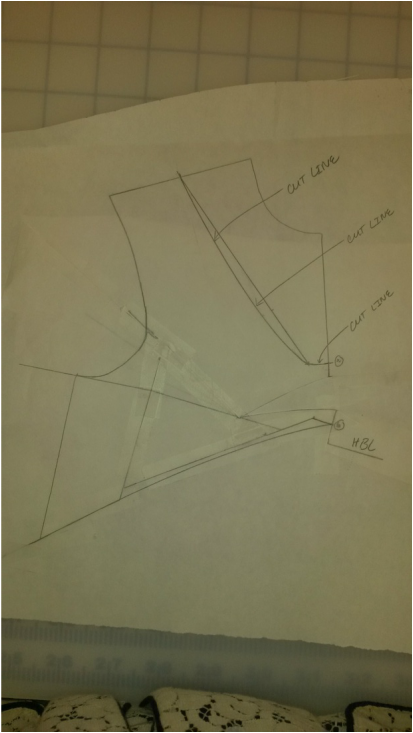
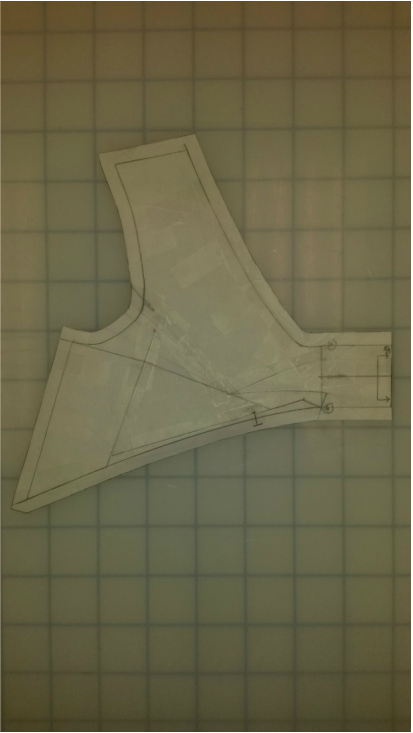
Notice the “end of seam point.” This is where the pattern gets cut for separating the bodice into two pieces. Mark a notch on either side of the “end of seam point” for matching/construction purposes later. The cut line continues on the downward diagonal line extending (left) to the side seam.
Extend the curve of the above line from the 1 cm point to the left of the center front point until it meets point “a.”
Using a hip curve, draw a slightly curved line from the armhole dart top to the point marked on the center line between points “a” and “b.” NOTE: I had previously backed the dart point away from the bust point, so for this exercise, I had to find the center of my dart and extend is once again to the bust point.
Notice the “end of seam point.” This is where the pattern gets cut for separating the bodice into two pieces. Mark a notch on either side of the “end of seam point” for matching/construction purposes later. The cut line continues on the downward diagonal line extending (left) to the side seam.
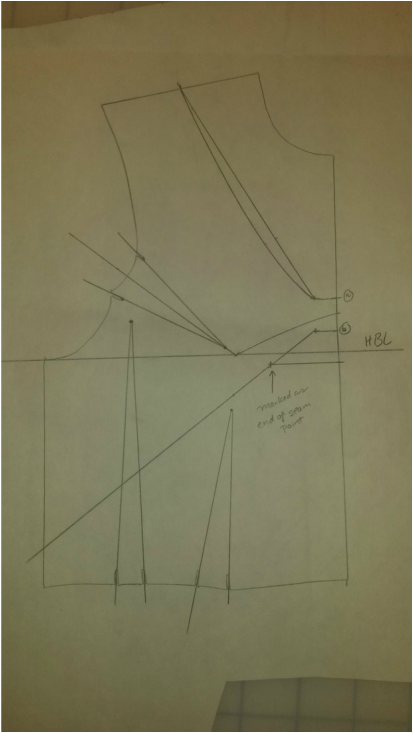
“End of seam point”
Step 6:
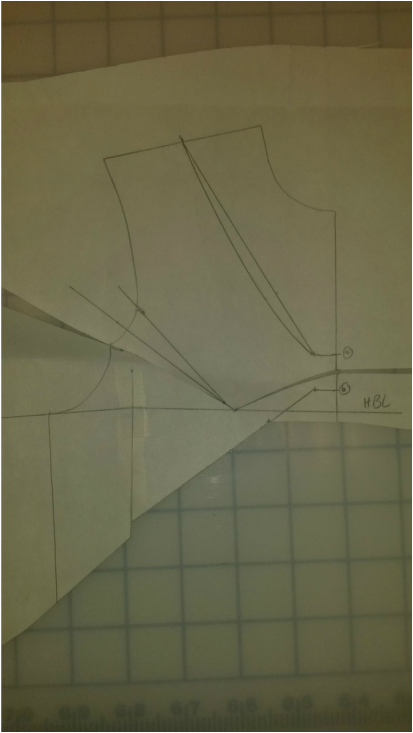
Extend the point on the waist dart on the lower bodice until it touches the cut line.
Extend the point of the waist dart next to the side seam until it touches the lower (nearest) dart leg of the armhole.
Step 7:
For the lower bodice:
Step 6:
Extend the point on the waist dart on the lower bodice until it touches the cut line.
Extend the point of the waist dart next to the side seam until it touches the lower (nearest) dart leg of the armhole.
Step 7:
For the lower bodice:
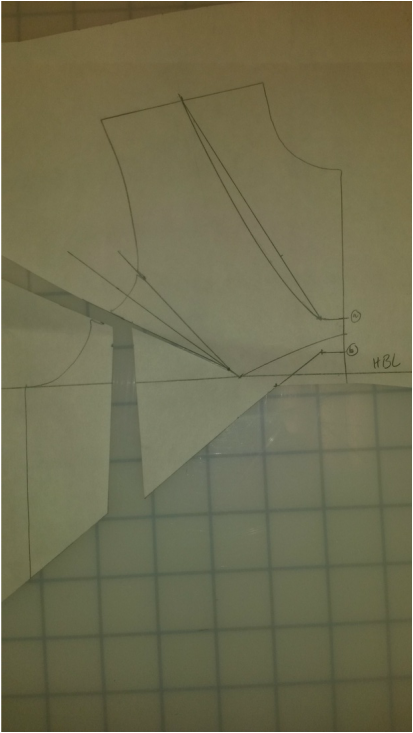
- Cut and close the darts on the lower bodice. Note that when the darts are closed they meet at the waistline and the top of the pattern piece is adjusted/redrawn.
- Using a hip curve, redraw the top line of the bottom bodice to create a smoother styleline.
- Draw a grainline on the lower bodice pattern piece denoting that it gets cut on the fold.
- Add seam allowances to the lower bodice to all sides except the center front, which gets cut on the fold. Cut out the pattern piece.
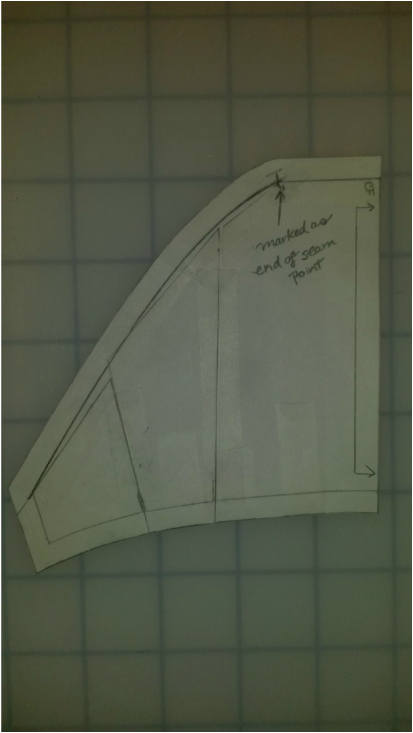
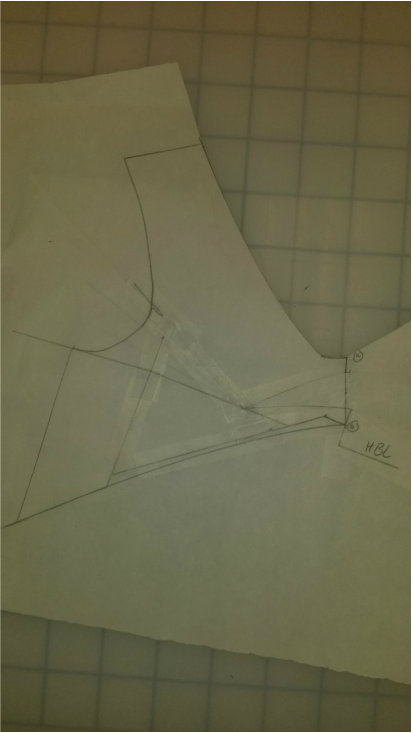
For the upper bodice:
- Cut and close the dart near the side seam (you will need to cut the lower side leg of the armhole dart to do this). Notice that the dart matches at the top when closed but is longer on the bottom left.
- In order to close the armhole dart, cut the slightly curved line extending from the dart point of the armhole dart to the point on the center front between points “a” and “b.” Note that this opens a space in the center front. Adjust/redraw the armhole if necessary.
- Cut away the bodice portion from point “b” on the center front and then down the diagonal line. This is part of creating the open space in the center front of the bodice pattern.
- Redraw the lower styleline of the upper bodice using a hip curve; align the hip curve with the point of the bodice side seam and point “b” in order to redraw the styleline.
- Cut the neckline (see arrows drawn to the cut line in the picture). Now there is a new off-set shoulder and scooped neckline.
Step 1 of Upper Bodice
Step 2 of Upper Bodice
Step 3 of Upper Bodice
Step 4 of Upper Bodice
Step 5 of Upper Bodice
Step 5 Completed
To pattern the center front knot:
- Using a ruler, draw a straight line from point “a” to point “b.”
- To determine the length needed to create the “knot” on the upper front bodice pattern piece, cut a length of fabric 3 ½ cm in width (plus seam allowances). Sew the strip of fabric with right sides together. Then turn the fabric strip and press. Tie a knot in the fabric strip and mark either side of the tied knot with a marker. Untie the knotted strip and measure the distance between the two markers that were on either side of the knot…this is the length that needs to be added to the center front of the upper bodice pattern piece.
- Determine the center point between points “a” and “b.” Extend lines from point “a,” the center, and “b” to create an extension for the knot. NOTE: the length of these lines are determined from the step above. The length of my extension equals 3 ½ cm.
- Draw the grainline on the upper bodice to denote that it gets “cut on the fold”…note that the “cut on the fold” mark is at the knot area of the pattern (see the picture below).
- Add seam allowance to the upper bodice (all sides except the center front “cut on the fold” side). Cut out the pattern piece.
Completed Upper Bodice with Knot Extension
Sewing the “knot” bodice:
Sewing the “knot” bodice:
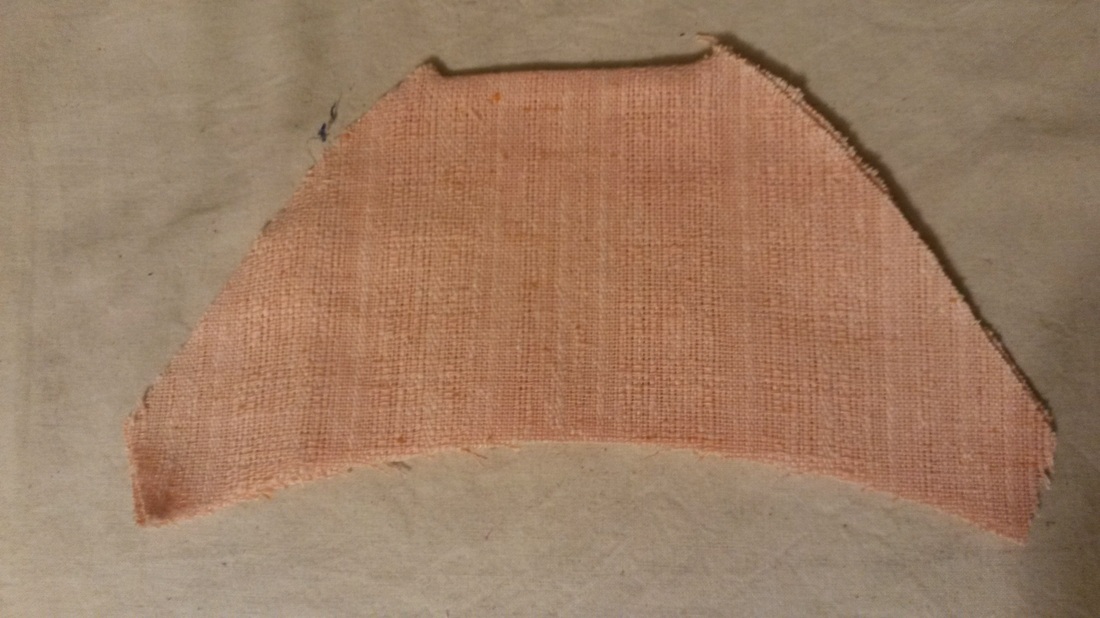
- Cut two of the upper bodice and match both pieces right sides together. Sew along the neckline from one should to the other shoulder. Also sew from notch to notch at the bottom of the upper bodice pieces. Turn sewn pieces back to the right side and press seam areas thoroughly.
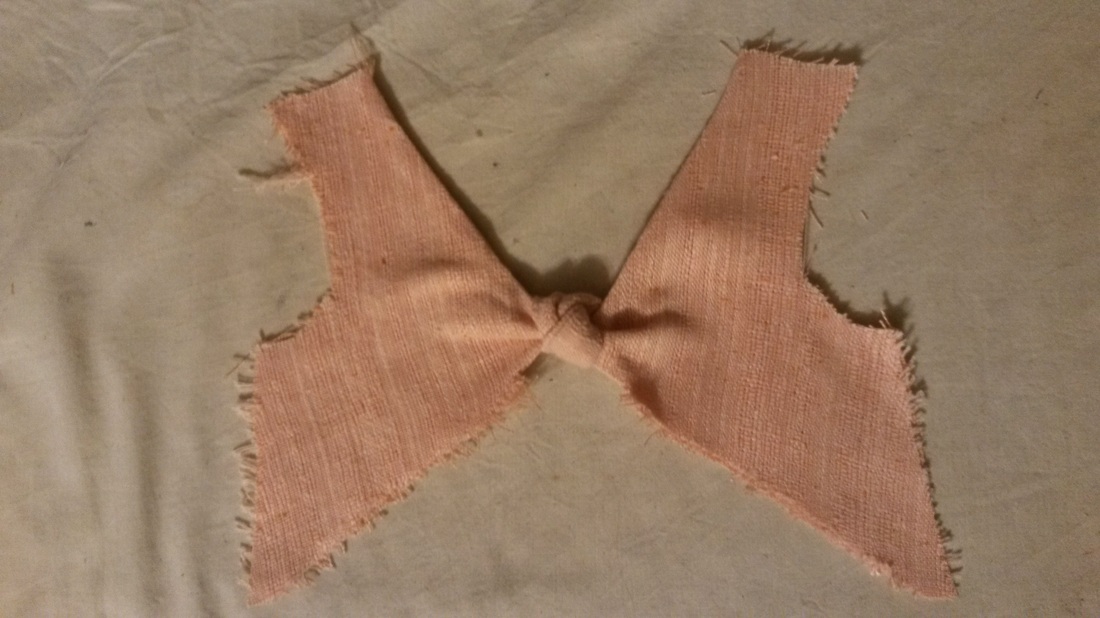
- Cut two of the lower bodice and match both pieces with the right sides together. Sew between the notches. Turn the pieces back to the right side and press thoroughly.
- Tie a knot in the center front of the upper bodice. Be sure to work the knot and bodice front until it looks attractive and allows both side of the upper bodice to lay flat.
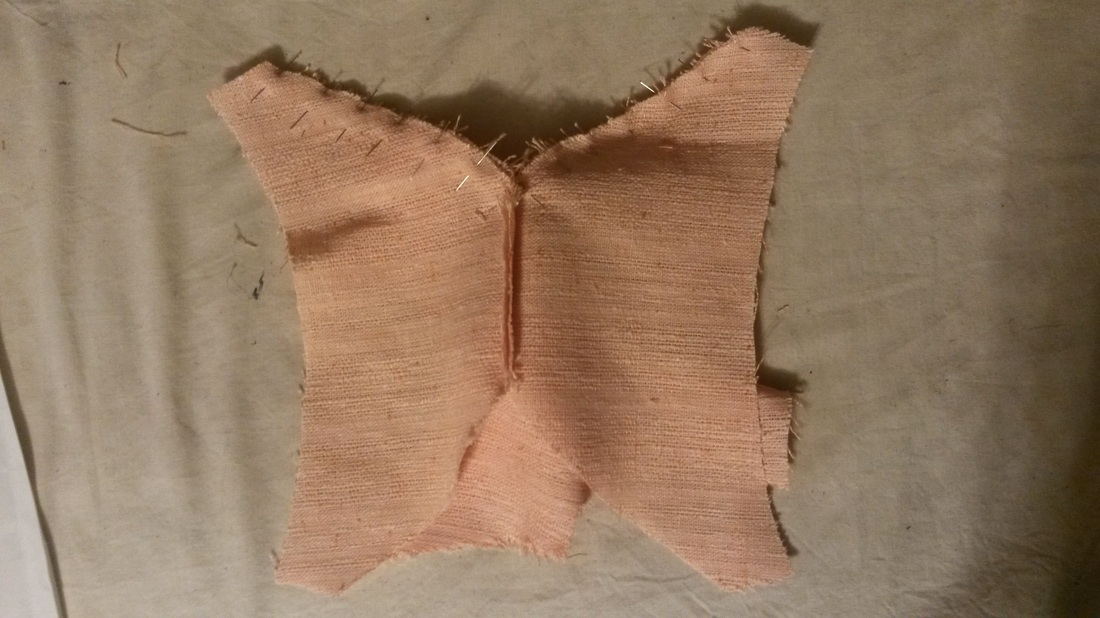
- Pin the lower bodice to the upper bodice (right side together) matching from the notches down to the side seams of each piece and sew. Turn and press thoroughly. Then repeat for the other side to connect the upper and lower bodice completely together. NOTE: when sewing, be sure to keep the “knot” out of the way so that it does not get caught in the sewing.
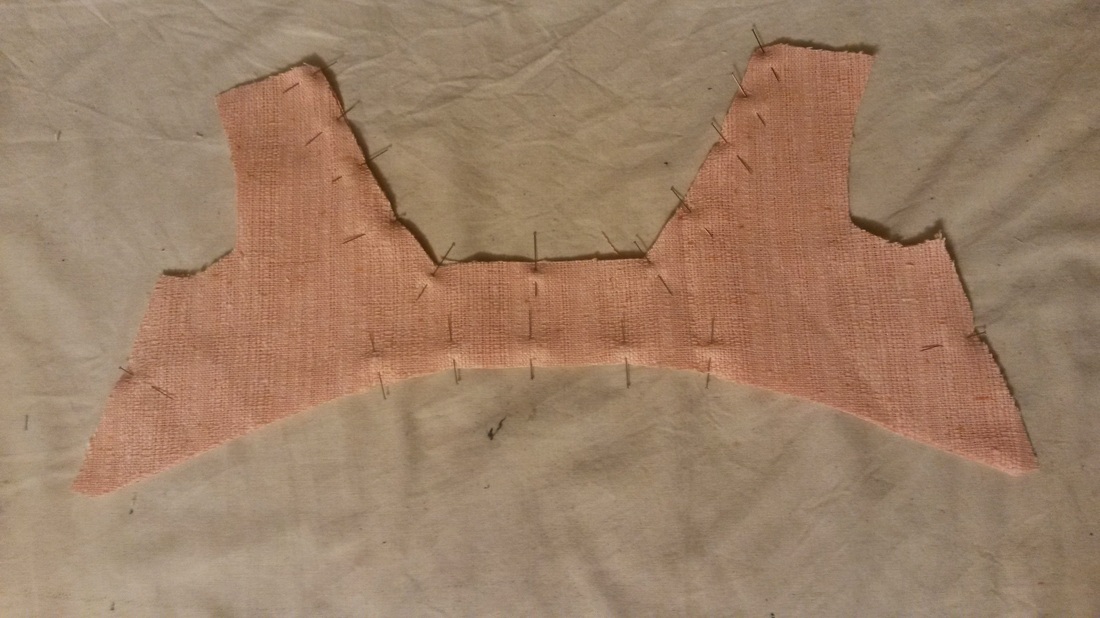
Step 1 of Sewing Upper Bodice
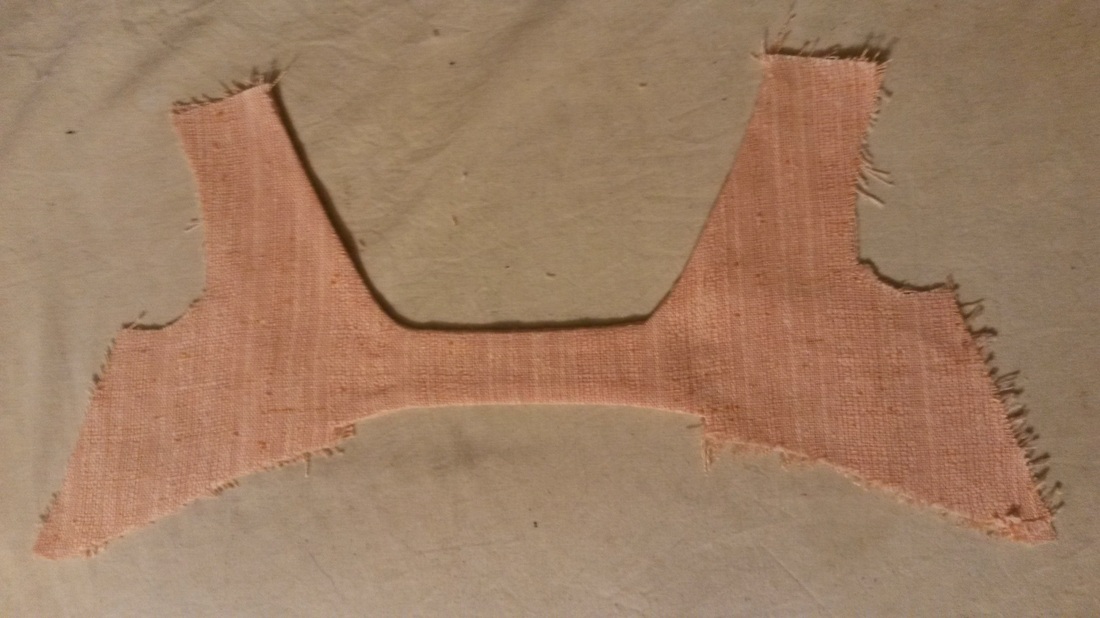
Step 1 of Sewing Upper Bodice - Completed
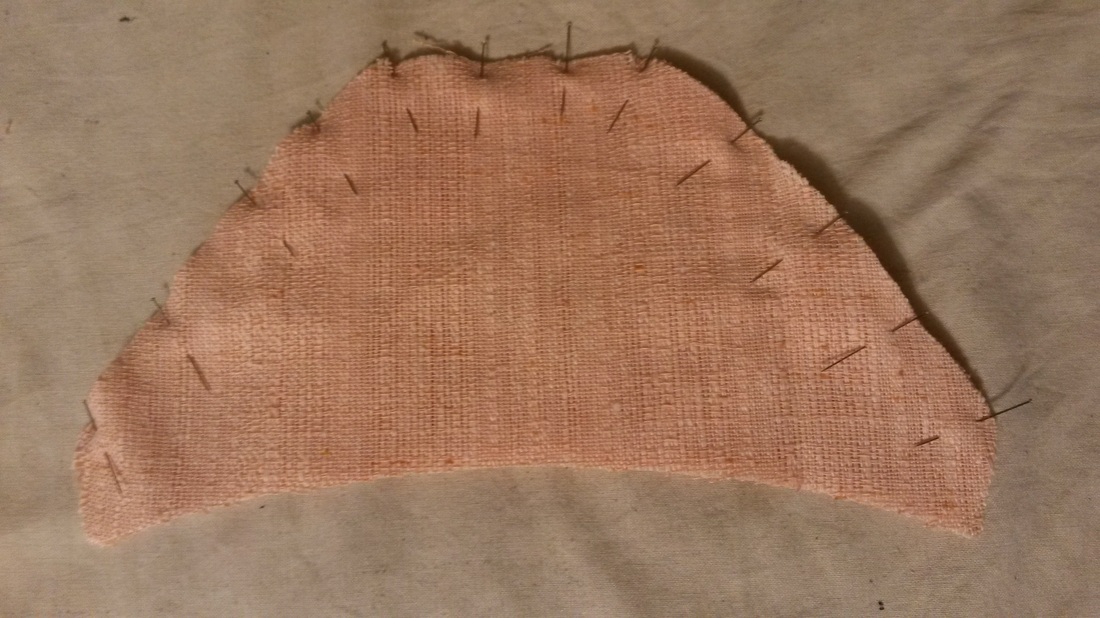
Step 2 of Sewing Lower Bodice
Step 2 of Sewing Lower Bodice - Completed
Step 3 of Tying a Knot in the Upper Bodice
Step 4 Completing Sewing the Upper Bodice
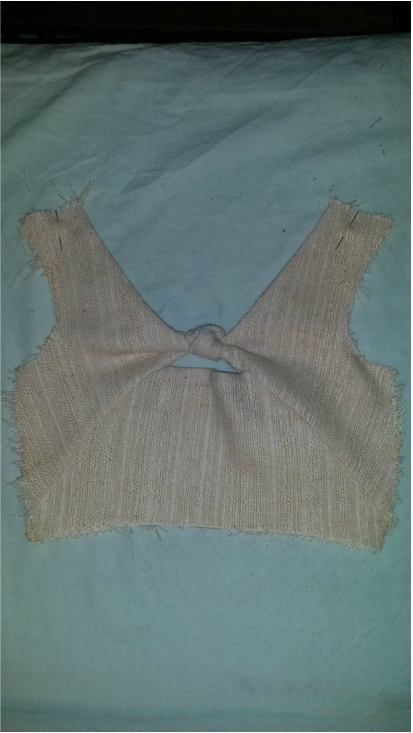
Step 4 Completed “Knots” Bodice
Adapting the “knots” technique
In order to adapt my own version of Nakamichi’s “knot” design, I used her “knots” dress design as a reference (2011, pp. 64 – 67).
Step 1:
I chose to adapt this technique as a skirt design. I used a one-dart skirt front sloper and drafted a complete skirt front pattern. I folded the pattern in half and used a French curve to draw an arc from the hem of the skirt pattern up to the center front line. I traced the arc onto the other side of the skirt pattern so that the arc is a complete arc.
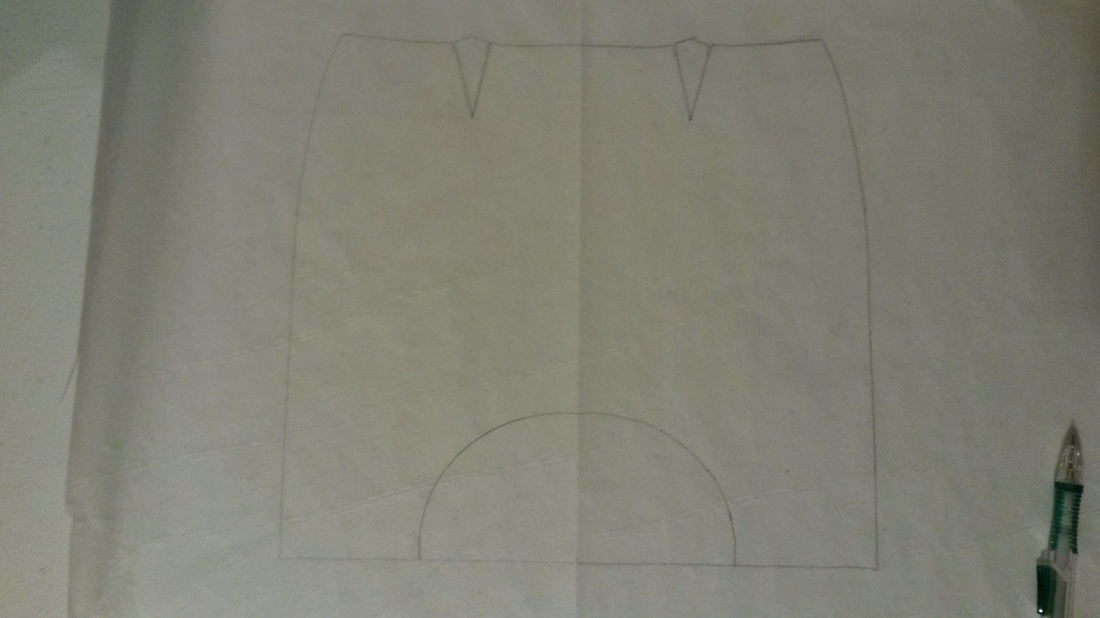
Step 2:
Draw stylelines on the skirt front from the place of your own choice down to the top of the arc. I chose to draw mine one from the right side of the skirt and the other two from both dart points.
Draw stylelines on the skirt front from the place of your own choice down to the top of the arc. I chose to draw mine one from the right side of the skirt and the other two from both dart points.
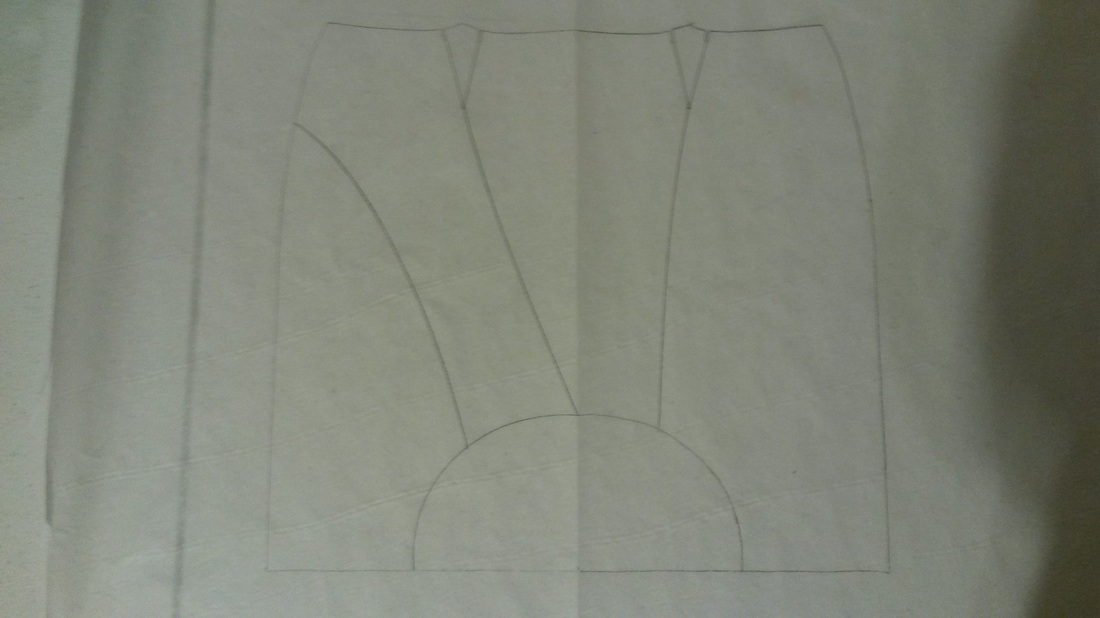
Step 3:
Trace off the individual pattern pieces and add notches for construction purposed; add grainlines. NOTE: I eliminated the arc are from my pattern pieces when I traced them off because this is where me “knots” will be located as part of the completed design.
Trace off the individual pattern pieces and add notches for construction purposed; add grainlines. NOTE: I eliminated the arc are from my pattern pieces when I traced them off because this is where me “knots” will be located as part of the completed design.

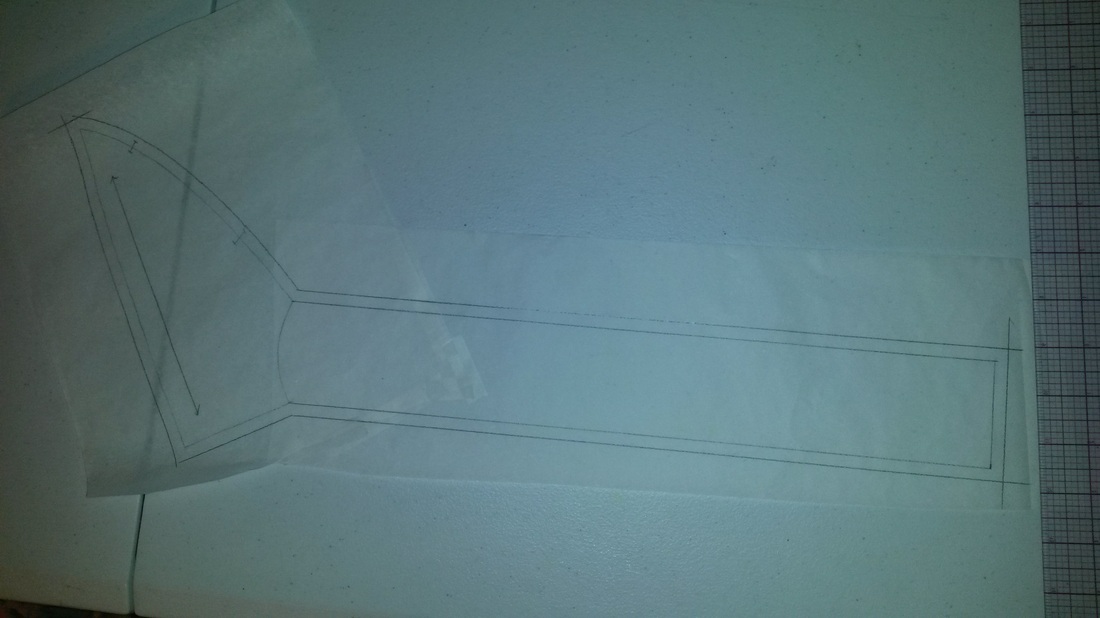
Step 4:
Add an extension of paper at the location of the arc area of each individual pattern piece and draft an extension/length of pattern, which will form the “knots.” Also, make notches at the top of each extension (to distinguish the skirt panels from the beginning of the extensions). I made my extensions 15” long. Add seam allowances to each pattern piece…I added seam allowances of ¼” on mine.
Add an extension of paper at the location of the arc area of each individual pattern piece and draft an extension/length of pattern, which will form the “knots.” Also, make notches at the top of each extension (to distinguish the skirt panels from the beginning of the extensions). I made my extensions 15” long. Add seam allowances to each pattern piece…I added seam allowances of ¼” on mine.
Step 5:
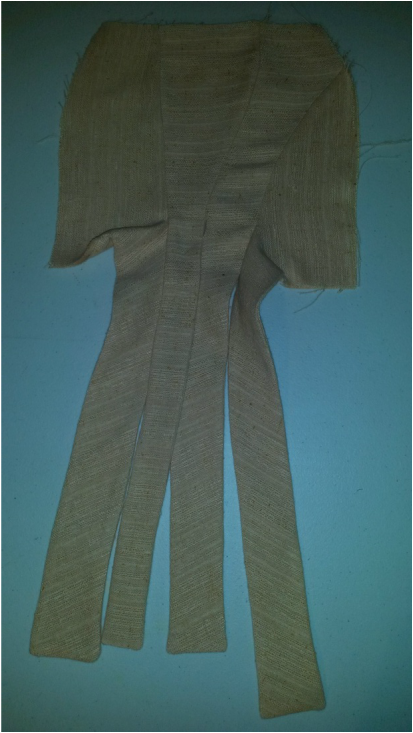
Cut out the paper pattern pieces and the cut two of each pattern pieces out of fabric.
Step 6:
With right sides together, sew each panel together around the extensions only from notch to notch. Trim the corners off of the seam allowances at the ends of each extension. Turn the sewn pieces back to the right sides and press thoroughly.
Step 7:
Pin and sew the seams of the skit from the top of the stylelines down to the notches on each of the pieces until all the stylelines of the skirt are fully sewn together and an entire skirt front is completed.
Step 8:
Tie the extensions into multiple knots (tie the “knots” one after the other down the extensions until each of the entire extensions are knotted…my extensions resulted in three knots for each extension). Tack the “knots” into place as desired from the backside of the design.
Tie the extensions into multiple knots (tie the “knots” one after the other down the extensions until each of the entire extensions are knotted…my extensions resulted in three knots for each extension). Tack the “knots” into place as desired from the backside of the design.
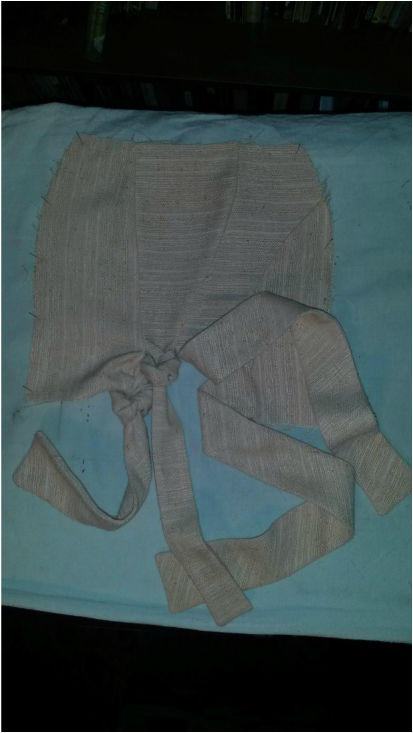
Tying Knots
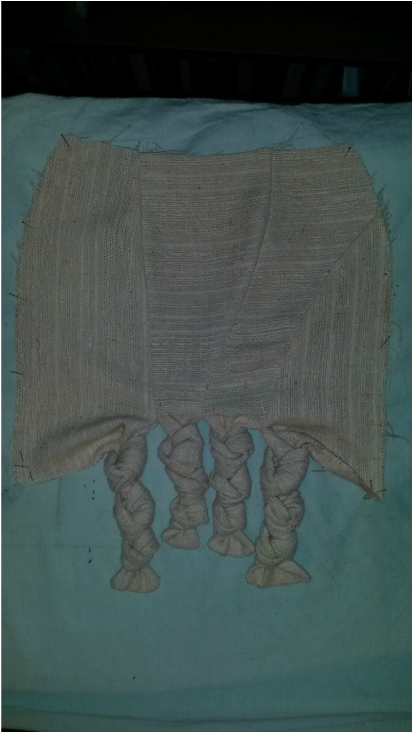
Completed Knots
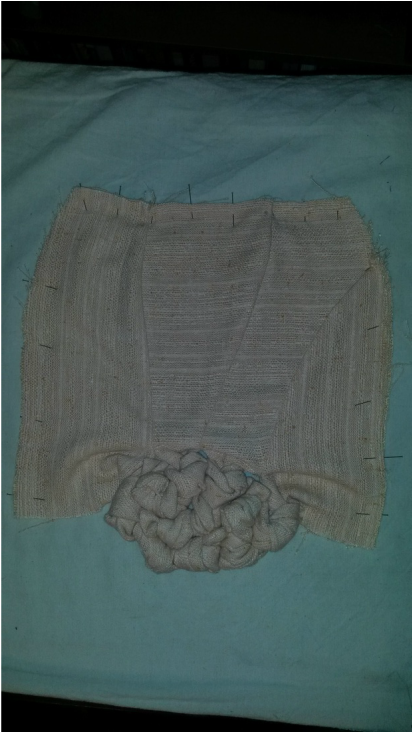
Knots Tacked into Position
I really like the outcome of this design. I enjoyed my application of the design more than Nakamichi’s “knot” bodice simply because of the creation allowing for more “knots.” I really like the design detail that the “knots” create. By making my own adapting of Nakamichi’s pattern design, I also discovered that more “knots” in the design adds weight to the design. This is a factor to be considered when designing the placement of the “knots” as well as choosing fabrics appropriate for the design. Although I also really like the texture of the woven fabric that I chose for these pattern applications, it began to unravel very quickly and is not very fond of handling. The final result turned out nicely in spite of this fact…crisp, textured “knots.” It would be interesting to create these patterns out of other fabrics such as silk habotai to get a softer, dressier result.
Evaluation of Patternmaking Application #2
Evaluation of Patternmaking Application #2
- Yes, I felt that I stayed true to the basic principles of Nakamichi’s pattern technique.
- I moved the pattern manipulation from the center front of the upper bodice to the front bottom of a skirt. Although I moved the location, Nakamichi’s pattern rules help true. Once again, I felt more confident with my own method than I did with Nakamichi’s and completed mine successfully and more easily although next time I would like to try to make my pattern extensions a little more uniform in width. I think I could accomplish this by dividing the arc into equal pieces and drawing the stylelines down to these equal points next time.
- Yes, all of the same rules still applied.
 RSS Feed
