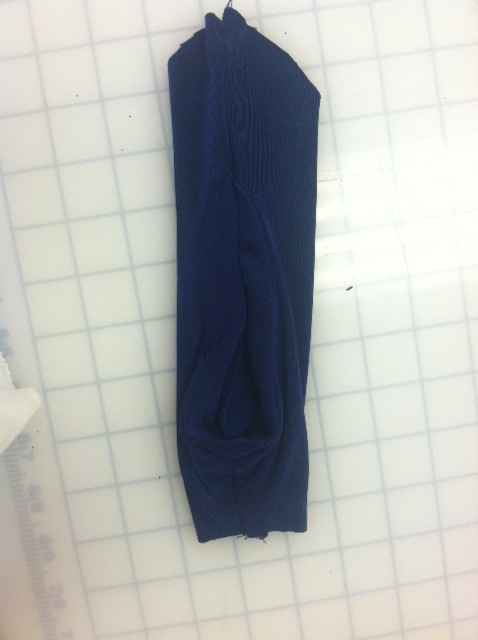
Draft & Muslin Stingray:
The Challenge: Create the assigned pattern in half scale. Sew a 1st sample.
This pattern was created in ½ scale.
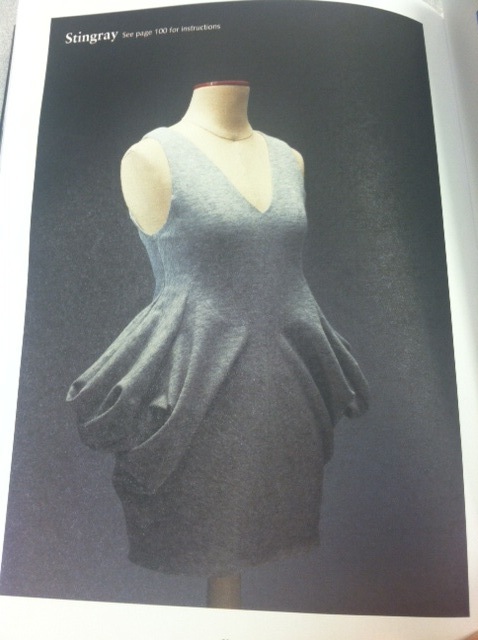
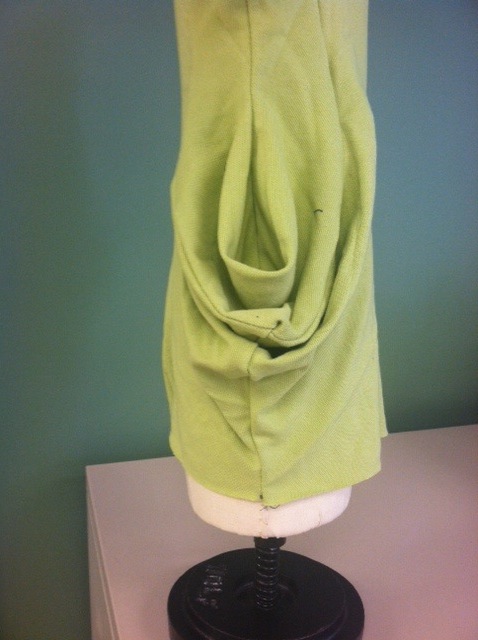
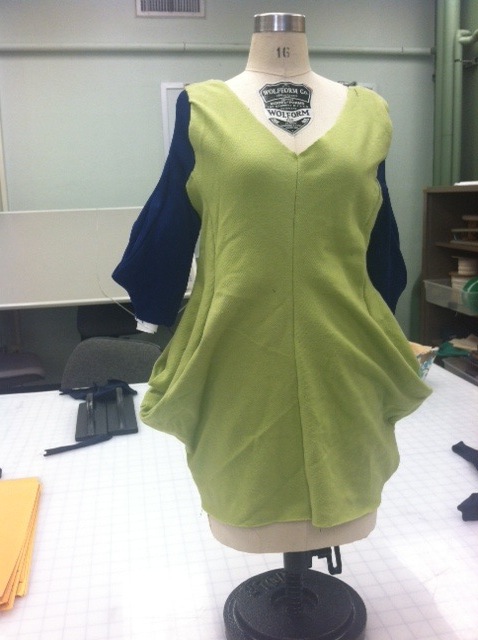
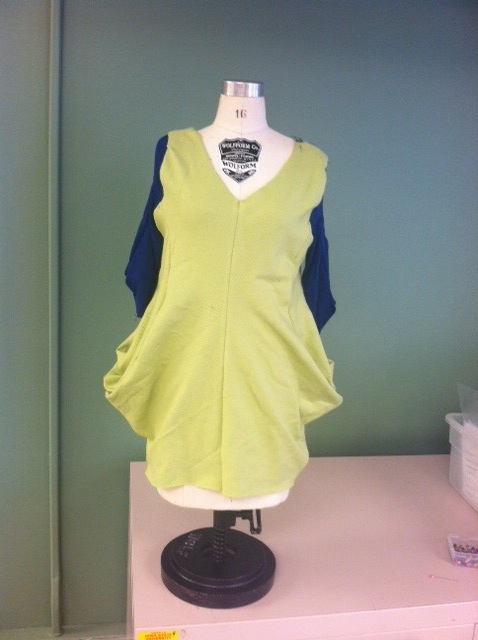
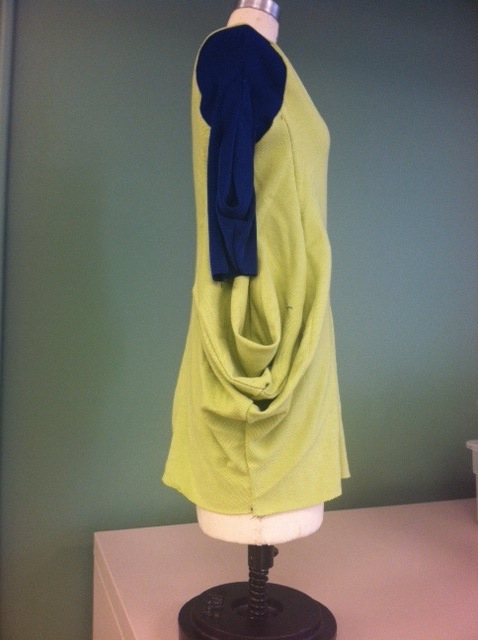
Stingray, on page 100, is a design where added fullness is added to the side seams to create almost a cowl effect on the hips. The book directions are pretty simply to follow if you pay close attention, this is the process:
The Challenge: Create the assigned pattern in half scale. Sew a 1st sample.
This pattern was created in ½ scale.
Stingray, on page 100, is a design where added fullness is added to the side seams to create almost a cowl effect on the hips. The book directions are pretty simply to follow if you pay close attention, this is the process:
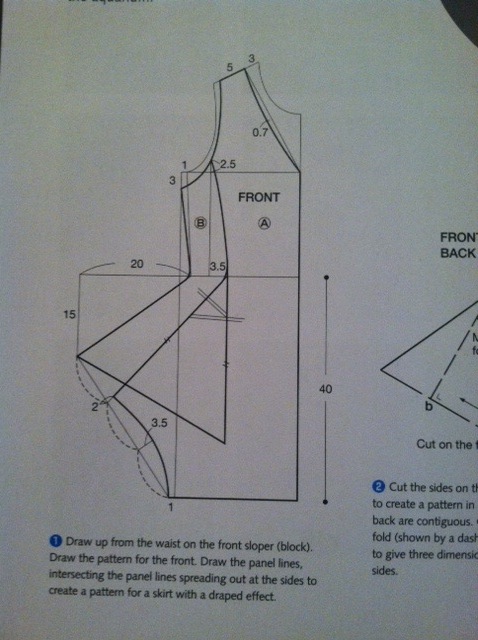
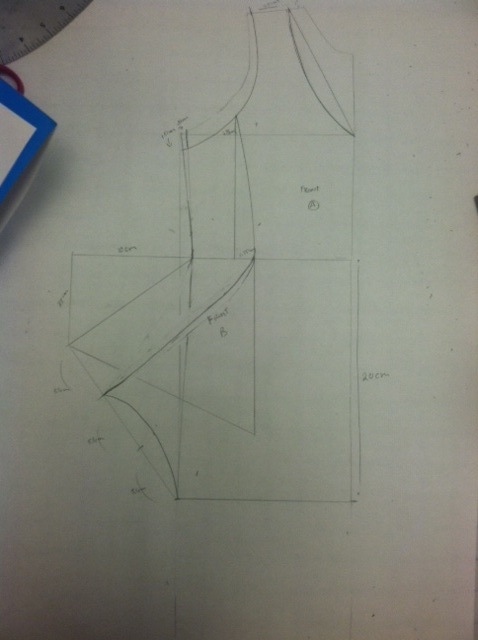
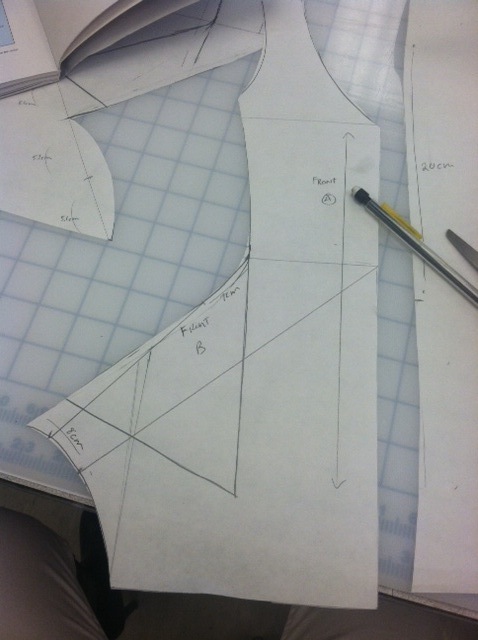
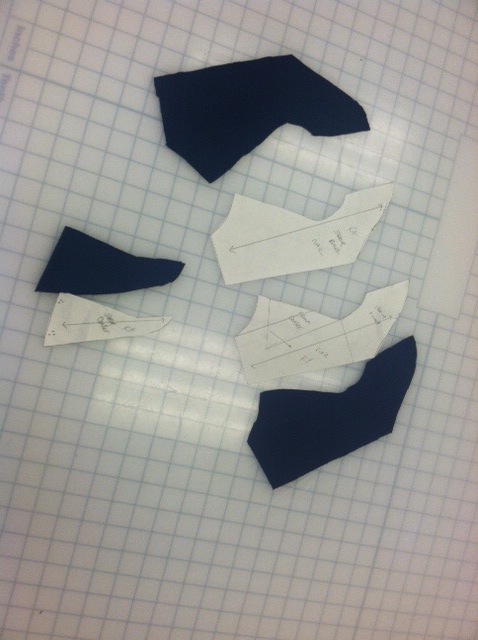
1. Trace the bodice front and skirt front lined up to create a torso block. Do not trace any of the darts; leave them all out, this will all be moved into the added fullness. Draw the skirt 20cm long.
2. Starting at the shoulder seam at the neckline, notch 1.5cm to the left.
3. Starting at the newly made notch, measure out 2.5cm to the left, this will be your new shoulder seam.
4. At the sideseam at the armhole, mark 1.5 cm down. Connect this line to the new shoulder seam using a French curve, this is your new armhole.
5. At the original sideseam at the armhole, go in towards the bodice .5cm and mark. Draw a parallel line with center front to the waist seam. Then draw a parallel line with the hem from the sideseam at the armhole to the CF bodice.
6. At the CF bodice, with the new intersecting line we drew in step 5. Connect from that point to the new shoulder seam point using a French curve, this is your new neckline.
7. Where the line parallel with the hem connecting to the CF bodice neckline crosses the newly drawn armhole, mark 1.25cm up the armhole. This is going to be the start of the side panel. Draw a slightly curved line from here to the waist. Continue this line straight down, this is where your new side seam hem will be drawn.
8. To draw the new side seam, connect the end of the newly drawn armhole (1.5cm down from original armhole sideseam) to the .5cm line over that was drawn to the waist. This is your new side seam
9. At your new side seam, measure out 10cm away from the pattern. Square down 7.5cm, draw a diagonal line from that mark to the waistline. This is your skirts new side seam.
10. From the end of the side seam draw a straight line from here all the way to the straight down line drawn in step 7. Label this entire area Bodice B, it will actually be retraced from this original pattern.
11. From the end of the sideseam to the original skirt hem, divide that area into 3 equal parts. 2/3 parts up from the original skirt hem make a mark. Connect this mark to the inner line drawn at the waist, the same line drawn in step 7.
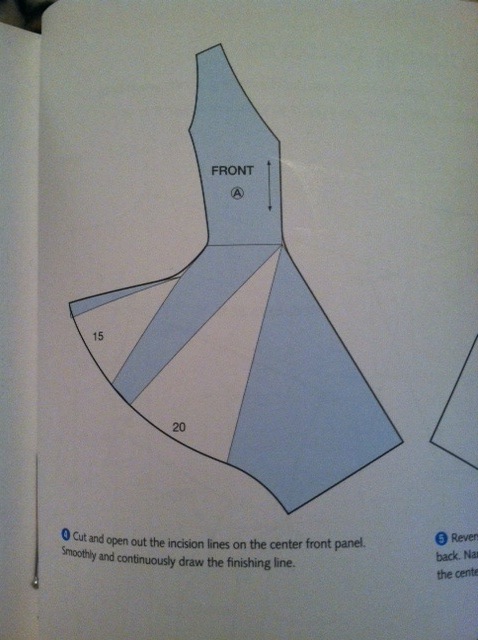
12. Curve the hem to connect to the original skirt hem.
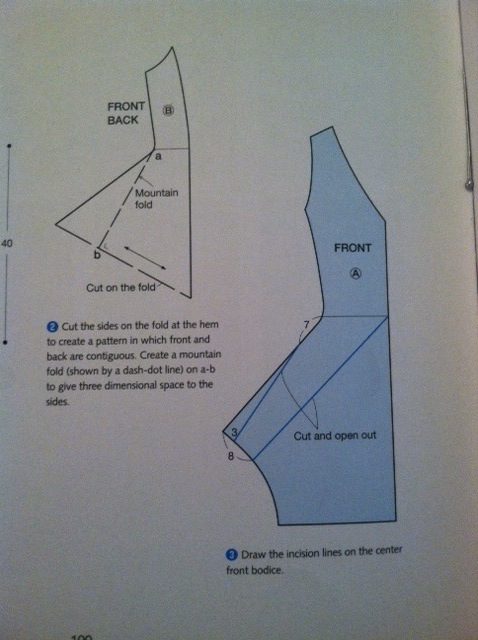
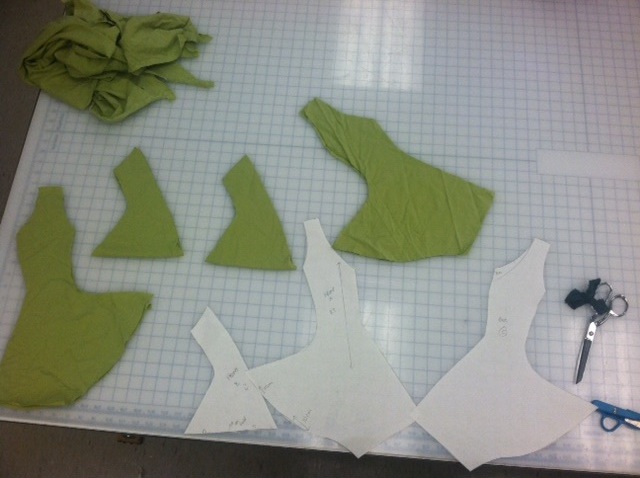
13. Your pattern piece will look slightly funny
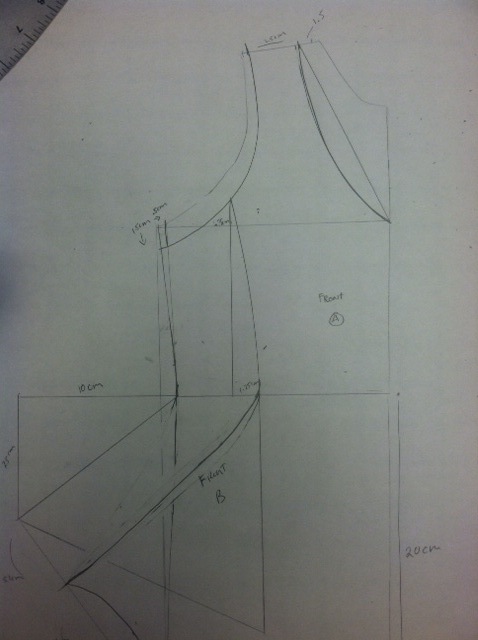
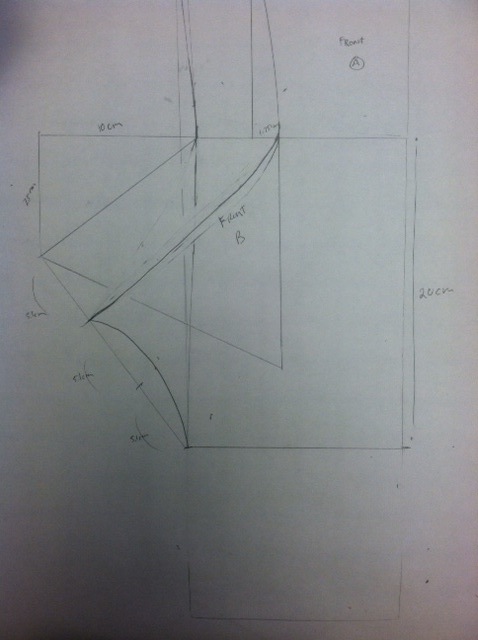
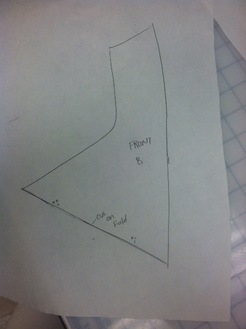
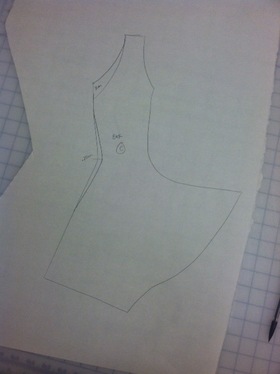
14. The area labeled bodice B needs to be traced onto another piece of paper. This is the side panel.
15. The hem of this pattern piece is cut on fold, it acts as the side panel for the back and also for the front.
15. The hem of this pattern piece is cut on fold, it acts as the side panel for the back and also for the front.
16. The bodice part A needs to be cut along the inner bodice and skirt side seam line. Creating an oddly shaped pattern piece.
17. At the curved part of the hem, from the side seam, mark down 1.5 cm and 4 cm. Connect the 1.5 cm mark to 3.5 down from the waistline at the sideseam. Connect the 4cm mark to the waist at CF.
18. Slash and spread both of these lines. The 1.5cm line should be spread 7.5cm and the 4cm line should be spread 10 cm. The bodice front is now complete

19. To create the bodice back, trace the bodice front.
20. Raise the neckline 3 cm and extend the sideseam out .75cm.
20. Raise the neckline 3 cm and extend the sideseam out .75cm.
To Sew:
21. Sew the bodice part b to bodice part a. Then sew the other half of bodice part b to the bodice back.
22. Sew the side seams of bodice B together.
23. Sew the shoulder seams
24. Sew the curved part of the hem on Front A and Back A together.
25. You are finished!
21. Sew the bodice part b to bodice part a. Then sew the other half of bodice part b to the bodice back.
22. Sew the side seams of bodice B together.
23. Sew the shoulder seams
24. Sew the curved part of the hem on Front A and Back A together.
25. You are finished!


Analysis:
Q1: What type of flat patternmaking is this: Dart manipulation? Added Fullness? Contouring? Something else? A combination?
This is all added fullness. There was not truly any dart manipulation because the darts were never drawn in the pattern to begin with. Added fullness was created by erasing the darts entirely, extending the side seam out at an angle, and by slashing and spreading.
Q2: What are the basic principles/rules of this pattern?
The measurements need to be followed to allow for pattern pieces to match up.
The side panel should be cut on fold to allow for proper drape
Enough fullness must be added to allow for proper cowl drape
Use a knit for proper drape or else it may need to be on the bias of a woven
Q3: Are these rules and principles always true?
I think using a knit or a woven on the bias is essential. Or else you will not get the proper drape effect.
Q4: What rules of traditional patternmaking are broken in this pattern?
None that I can think of
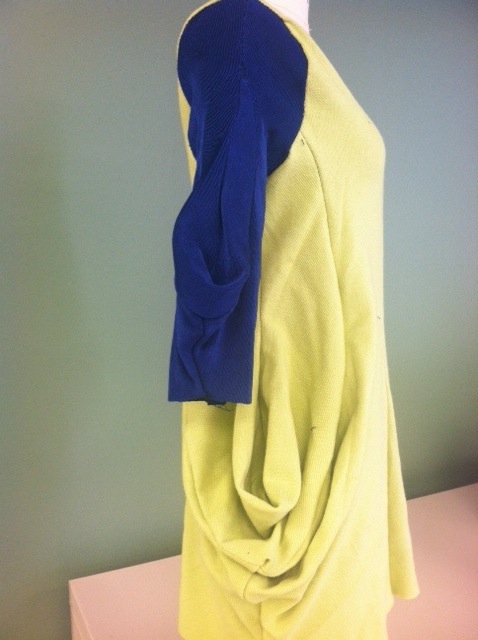
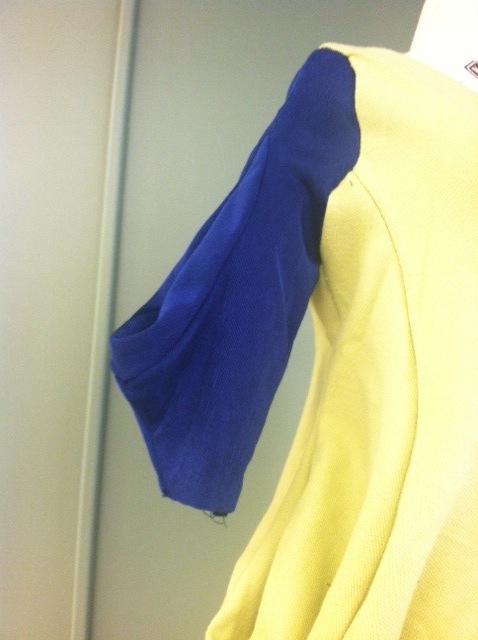
Application: The Challenge: Create your own half scale pattern by applying the rules and principles of this pattern in a different location of the garment. Sew a 1st sample.
I continued Stingray onto the top of the sleeve. This was simpler since it did not have to work around any darts or bust points.
1. Trace the half scale sleeve pattern
2. Draw a line down the center of the sleeve, cut apart
I continued Stingray onto the top of the sleeve. This was simpler since it did not have to work around any darts or bust points.
1. Trace the half scale sleeve pattern
2. Draw a line down the center of the sleeve, cut apart
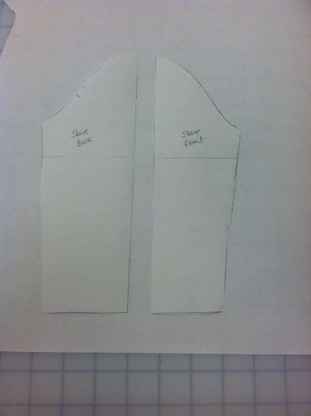
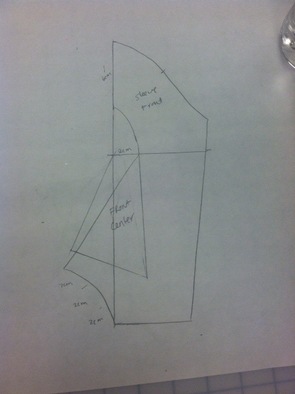
3. Using the sleeve front, draw a mark 6cm down from the top of the sleeve cap on the centerline.
4. 1” below the sleeve cap on the side seam make a mark and draw a horizontal line across.
5. At the center of the sleeve front on the horizontal line mark over 2cm. Connect from the mark drawn in step 3 curved down to the new mark 2cm and continue the line straight down about ¾ of the sleeve.
6. At the CF line drawn in step 4, draw the new side seam for sleeve part B, angled out, approximately 8cm. Connect this line to the line drawn straight down in step 5.
7. From where the line in step 5 connects with the line in step 4, draw an angled line 2cm longer than the angled line drawn in step 6.
8. Draw a curved hemline, just as you did with the dress, to the original sleeve hem.
9. Trace the center sleeve A just as you did Bodice B in the dress.
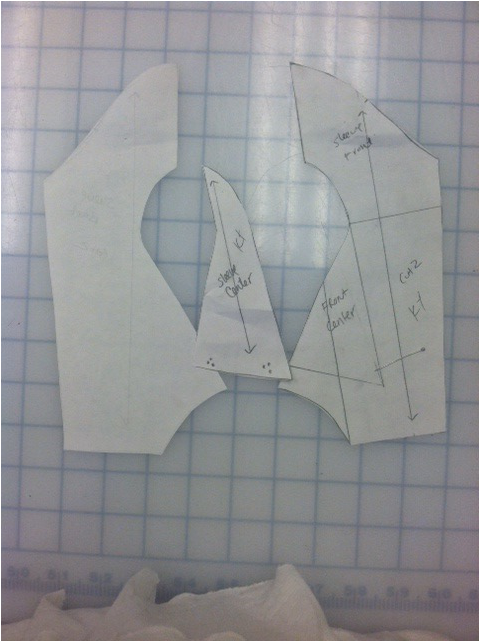
10. Cut the sleeve front part 1 on the inner side seam.
11. Trace the front sleeve laying the back sleeve on top and re-tracing the back sleeve cap. You now have front and back sleeve.
12. Cut the center panel on fold just as you did with the dress.
11. Trace the front sleeve laying the back sleeve on top and re-tracing the back sleeve cap. You now have front and back sleeve.
12. Cut the center panel on fold just as you did with the dress.
To Sew:
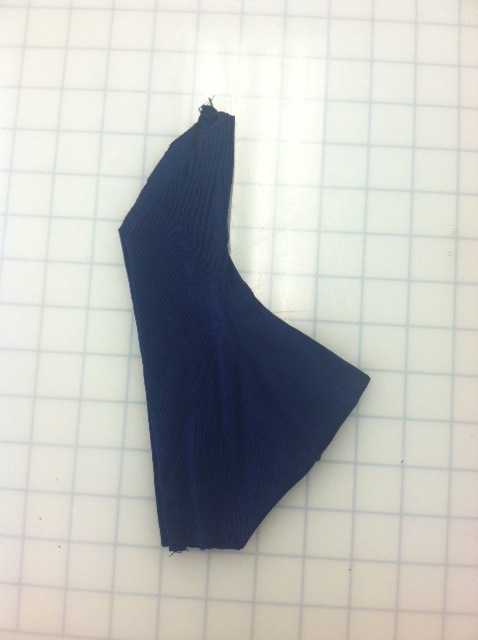
13. Sew the center panel sleeve to the front sleeve, then sew the other half of the center panel sleeve to the back sleeve.
14. Sew the side seams of the center panels together
15. Sew the curved hemline together at the bottom of the front and back seam.
16. Sew the actual sideseam of the sleeve together.
17. Sew the sleeve cap into the dress.


Evaluation:
Q1: Did you stay true to the basic principles of the original pattern?
Yes the same basic principles were followed just with different measurements.
Q2: Where did you move the pattern manipulation and how well did that work?
The pattern was moved to the top of the sleeve. I think it worked very well and created a cowl in the sleeve. I would add more fullness if I was to do this again but all-in-all I think it came out successful.
Q3: Do all the same rules still apply? Did the need for new rules appear when you made this change?
The same rules still applied and there was no need for more rules.
 RSS Feed
