Analysis of Pattern Application #4:
According to Nakamichi (2012, p. 32), this method combines two shirts together, a smaller one with a larger one, which she refers to as “two peas in a pod.” I personally think this title is fitting since the smaller shirt is basically nestled with the seamlines of the larger shirt. In my opinion, it has an interesting outcome.
Applying the “Two Peas in a Pod A” technique
NOTE: I found that all the measurements that Nakamichi gave in her book (2012, p. 32) would likely need to be divided in half in order to create the half scale pattern. It is worth noting that although these dimensions must be decreased by half, I found these measurements are not exactly consistent in achieving the desired outcome. I had to make my own estimates of measurements and create my pattern as I felt was proportionally correct.
Step 1:
For the purposes of creating this Nakamichi pattern technique, I quickly discovered that the knit patterns in her book are much smaller than required to draft a half scale pattern for my mannequin. Therefore, I used a half scale torso pattern and converted it into a knit pattern using Joseph-Armstrong’s methods (2010, pp. 633 - 635).
- This Nakamichi pattern technique uses pattern principle #2, added fullness. She uses equal added fullness for this pattern method.
- The basic principles of this pattern are described by Joseph-Armstrong (2010, p. 133) as equal fullness when “opposite sides of a pattern are equally spread, increasing fullness, to top and bottom.”
- I think the basic rules of this pattern are to create equal fullness through a nontraditional manner of patterndrafting. After analyzing this pattern technique, it is evident that equal fullness is not created in the conventional manner used by Joseph-Armstrong. Nakamichi could have easily used the Joseph-Armstrong spreading method to achieve the same ideal for equal fullness (e.g. Joseph-Armstrong, 2010, p. 133). The exception in this patterning method lies in the difference of the sizing of the pattern pieces themselves, which Nakamichi created through patterndrafting methods and then enlarging and reducing the pattern pieces on a copy machine.
- In the case of this patternmaking application, I would say that the pattern principle of added fullness, i.e. equal fullness, holds true, but Nakamichi demonstrated that it can be accomplished in a different manner. I feel that this pattern technique proves that while basic patternmaking principles are applicable, the traditional rules can be completely broken and achieve the same result.
- Nakamichi’s technique differs from the traditional method of achieving equal fullness as described above by Joseph-Armstrong because she used a copy machine to enlarge and reduce her pattern pieces in order to created equal added fullness. In my opinion, Nakamichi broke the traditional pattern rules in creating her “Two Peas in a Pod A” method of patternmaking because she deviated from traditional drafting techniques. Nakamichi’s method strangely results in a creation of the same concept of equal added fullness. In my opinion, Nakamichi has created an interesting manner of accomplishing equal added fullness to a pattern; her technique definitely does not abide by any pattern rules that I have seen before.
According to Nakamichi (2012, p. 32), this method combines two shirts together, a smaller one with a larger one, which she refers to as “two peas in a pod.” I personally think this title is fitting since the smaller shirt is basically nestled with the seamlines of the larger shirt. In my opinion, it has an interesting outcome.
Applying the “Two Peas in a Pod A” technique
NOTE: I found that all the measurements that Nakamichi gave in her book (2012, p. 32) would likely need to be divided in half in order to create the half scale pattern. It is worth noting that although these dimensions must be decreased by half, I found these measurements are not exactly consistent in achieving the desired outcome. I had to make my own estimates of measurements and create my pattern as I felt was proportionally correct.
Step 1:
For the purposes of creating this Nakamichi pattern technique, I quickly discovered that the knit patterns in her book are much smaller than required to draft a half scale pattern for my mannequin. Therefore, I used a half scale torso pattern and converted it into a knit pattern using Joseph-Armstrong’s methods (2010, pp. 633 - 635).
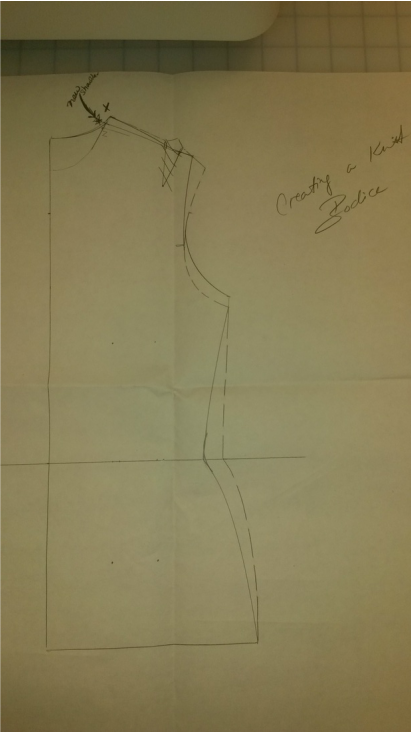
Knit Pattern Foundation for Front and Back Torso
Step 2:
Follow Nakamichi’s instructions for creating the knit pattern in her book (e.g. 2012, p. 32).
NOTE: In order to draft the sleeve portion of Nakamichi’s pattern, I had to create a 4 cm line for the underarm because I felt it would not be long enough otherwise. I then used a hip curve to create the underarm curve. Also, the shoulder seam measurement cannot be divided in half to create the half scale pattern…this will not result in the correct proportions. Once I drafted the underarm, I extended the shoulder line and then used my ruler to square a line from the end point of the underarm up to the shoulder line.
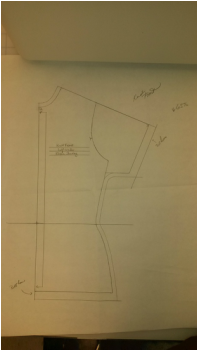 | 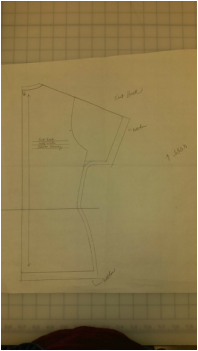 |
Knit Top Pattern FRONT Knit Top Pattern BACK
Step 3:
After drafting the patterns for the knit top (front and back), the next step according to Nakamichi (2012, p. 32), is to copy both of the pattern pieces on a copy machine. Reduce the front pattern by 65% and enlarge the back pattern piece by 135%.
NOTE: I made the mistake of adding seam allowances to my patterns before copying them. Nakamichi never discussed this step in her pattern method. Therefore, I learned by trial and error that the seam allowances have to be added to the pattern pieces after copying as otherwise, the seam allowances are no longer the correct widths.
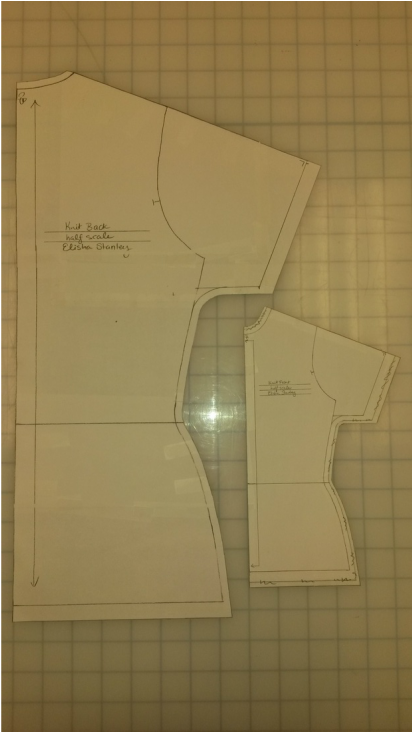
Knit Top FRONT and BACK Pattern Pieces after Copying
Step 4:
Sewing “Two Peas in a Pod A”:
Step 4:
Sewing “Two Peas in a Pod A”:
- Run a gathering stitch within the seam allowance of the shoulder seams of the larger (back) knit piece.
- Next match the larger knit piece to the smaller knit piece (right sides together). Matching at the neck and shoulder seam edges. Gently pull on one of the gathering threads to “gather” the larger piece until it fits the smaller one…evenly spread the gathers and pin or temporarily stay stitch in place for sewing.
- Sew shoulder seams using a zigzag stitch allowing the fabric to be stretched as it is sewn.
- Carefully, remove the gathering threads only.

Knit Top with Sewn Shoulder Seams
- Run a gathering stitch within the seam allowance of the underarm all the way around down the side seam to the hem of the larger knit top piece.
- Next match the larger knit piece to the smaller knit piece (right sides together). Matching at the underarm edge of the sleeve end, the underarm at the top of the side seam, the waist point, and the side seam hem. Gently pull on one of the gathering threads to “gather” the larger piece until it fits the smaller one…evenly spread the gathers and pin or temporarily stay stitch in place for sewing.
- Sew the seams using a zigzag stitch allowing the fabric to be stretched as it is sewn.
- Carefully, remove the gathering threads only.
- Repeat these steps to complete the other side seam.
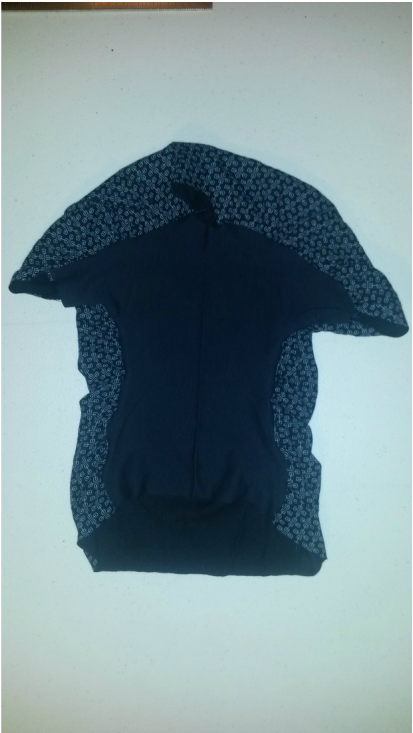
Knit Top with Sewn Side Seams
Adapting the “Two Peas in a Pod A” technique
In order to adapt my own version of Nakamichi’s “Two Peas in a Pod A” technique, I used her draft and copy method (e.g. 2012, p. 32) to create a skirt design; I used my knit torso patterns to draft my knit skirt pattern piece.
Adapting the “Two Peas in a Pod A” technique
In order to adapt my own version of Nakamichi’s “Two Peas in a Pod A” technique, I used her draft and copy method (e.g. 2012, p. 32) to create a skirt design; I used my knit torso patterns to draft my knit skirt pattern piece.
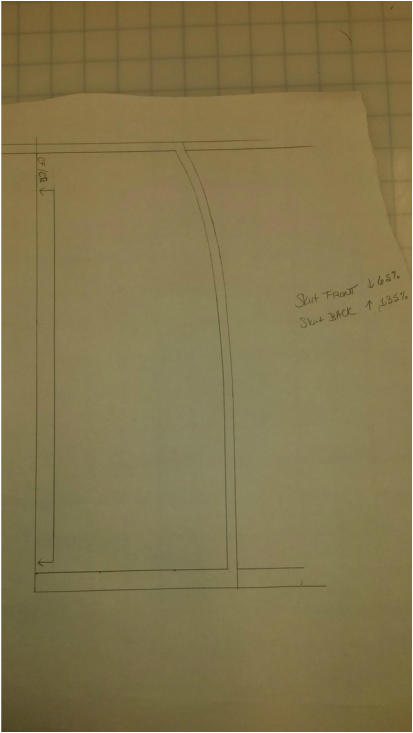
Knit Skirt Pattern FRONT and BACK
Step 1:
After drafting the patterns for the knit skirt (front and back), the next step according to Nakamichi (2012, p. 32), is to copy both of the pattern pieces on a copy machine. Reduce the front pattern by 65% and enlarge the back pattern piece by 135%.
NOTE: the knit skirt front and back are actually the same pattern piece. Therefore, only one pattern piece needs to be created and then enlarged and reduced per amounts suggested by Nakamichi.
NOTE: I made the mistake of adding seam allowances to my patterns before copying them. Nakamichi never discussed this step in her pattern method. Therefore, I learned by trial and error that the seam allowances have to be added to the pattern pieces after copying as otherwise, the seam allowances are no longer the correct widths. I was creating all of my pattern pieces at once, which is why this happened for my own application as well.
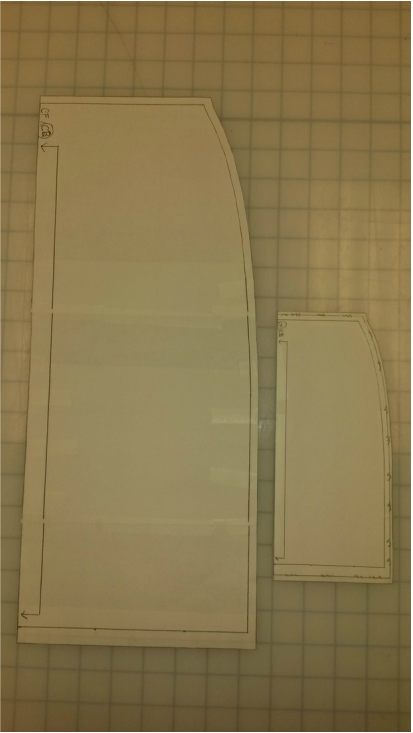
Knit Skirt FRONT and BACK Pattern Pieces after Copying
Step 2:
Sewing “Two Peas in a Pod A” knit skirt:
Step 2:
Sewing “Two Peas in a Pod A” knit skirt:
- Run a gathering stitch within the seam allowance of the side seams of the larger (back) knit piece.
- Next match the larger knit piece to the smaller knit piece (right sides together). Matching at the top of the side seam (waist) and the bottom of the side seam (hem). Gently pull on one of the gathering threads to “gather” the larger piece until it fits the smaller one…evenly spread the gathers and pin or temporarily stay stitch in place for sewing.
- Sew the side seams using a zigzag stitch allowing the fabric to be stretched as it is sewn.
- Carefully, remove the gathering threads only.
- Repeat these steps to complete the other knit skirt side seam.
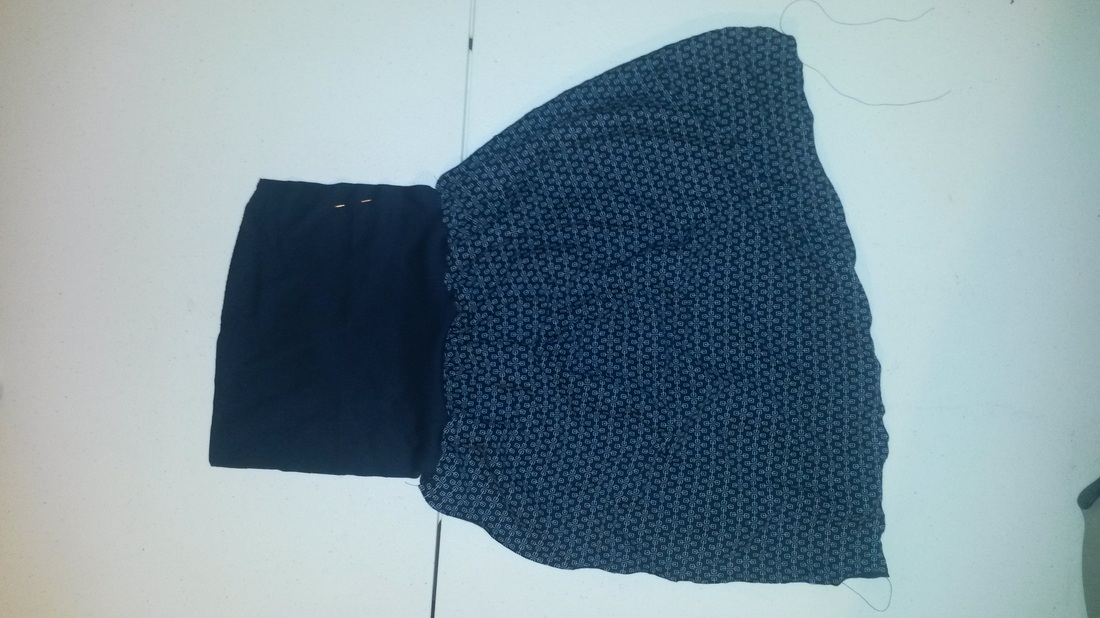
Knit Skirt with One Side Seam Sewn
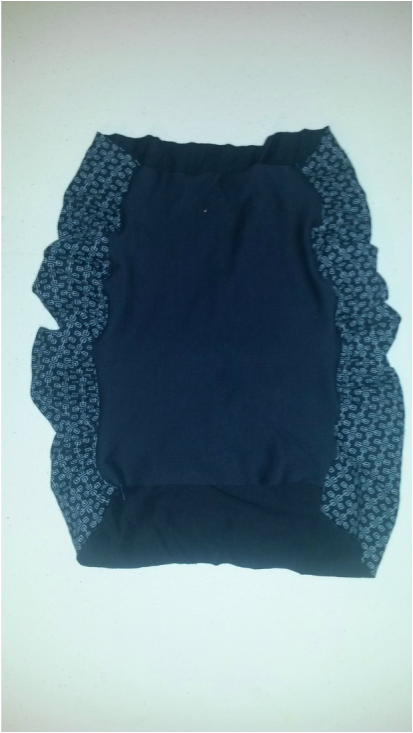
Knit Skirt with both Side Seams Sewn
I really like the outcome of this design. I was wondering if my application of Nakamichi’s design would actually work…surprise, it did, and I am quite happy with the outcome! If this same application were made into a life-size design, it would definitely need a waistband in order to control the waistline of the skirt and provide support for the design. I am also wondering how the back (gathered) pattern piece would be affected in full scale, particularly when it is worn. I am wondering if perhaps the pattern might need to be adjusted to add extra room to accommodate the natural curve of the backside. Also, would such a pattern design add “weight” to the wearer? I chose to combine a solid knit with a patterned knit for this design because I felt that it would create interest and also showoff the design of the pattern. I really like the combination of the two knit fabrics.
Evaluation of Patternmaking Application #2
- Yes, I felt that I stayed true to the basic principles of Nakamichi’s pattern technique.
- I manipulated Nakamichi’s pattern by applying her concept to a skirt rather than a top as she did. Although I changed the location, Nakamichi’s pattern rules help true. It would be interesting in the future, to enlarge and reduce various pattern pieces to see how different designs might be affected and test if Nakamichi’s method still holds true or would have to be adapted.
- Yes, all of Nakamichi’s same rules still applied.

 RSS Feed
