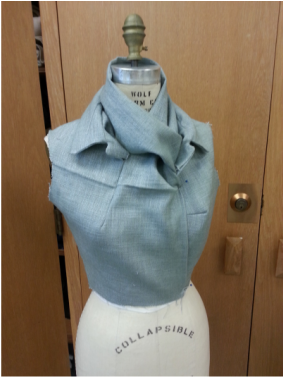
The “Vanishing Scarf” from Nackamichi’s Pattern Magic 2 was the application completed this week. From the pictures of the finished product, it is a blouse with a collar that incorporates a scarf that disappears in the opening at the top of the shirt.
In the initial stages of this pattern Nackamichi had me manipulate darts in the front and back bodice to create this design. For the back bodice I simply slashed a line from the armhole to the top of the dart tip closest to the side seam. I closed the dart closest to the side seam. This opened up a small section at the armhole. This opening was ignored in the trueing process. The measurements that were manipulated at the shoulder seam were very self-explanatory. Nackamichi doesn’t clarify this in his book, but you will trace the front bodice sloper twice because the front of the garment will be asymmetrical in the end. After tracing the bodice front twice, you will make a slash line, for one of the bodice pieces, midway through the neckline. This will be label as piece B. The other bodice piece will have a slash line from center front to the dart tip closest to center front that is parallel to the waistline. This will be labeled as piece A. Again, the neckline manipulations of the front bodice piece were very self explanatory.
In the initial stages of this pattern Nackamichi had me manipulate darts in the front and back bodice to create this design. For the back bodice I simply slashed a line from the armhole to the top of the dart tip closest to the side seam. I closed the dart closest to the side seam. This opened up a small section at the armhole. This opening was ignored in the trueing process. The measurements that were manipulated at the shoulder seam were very self-explanatory. Nackamichi doesn’t clarify this in his book, but you will trace the front bodice sloper twice because the front of the garment will be asymmetrical in the end. After tracing the bodice front twice, you will make a slash line, for one of the bodice pieces, midway through the neckline. This will be label as piece B. The other bodice piece will have a slash line from center front to the dart tip closest to center front that is parallel to the waistline. This will be labeled as piece A. Again, the neckline manipulations of the front bodice piece were very self explanatory.
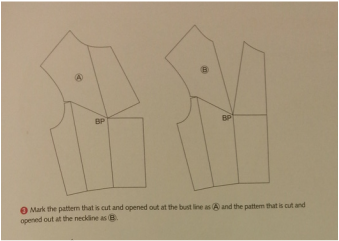 |  |
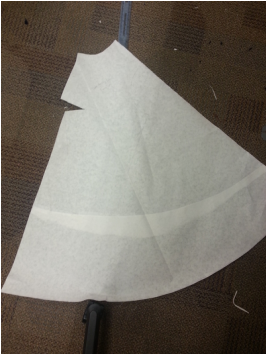
Using piece A you will add a 4cm extension from the center front neckline to the top dart leg. This will be your Left Front pattern piece. Developing piece B was a littler more difficult. There was a lot less instruction in the creation of this piece. To create this piece you will need both piece A and piece B. Overlap the two pieces so the center front waist-line and the shoulder seam match up. Nackamichi does a good job illustrating the pattern piece you are making but there is not much explanation. You will draw the triangle shape that is shaded gray from A-B-C. Next, you will extend point B along the center front up 1cm. This will be point B1. Points B and B1 become the beginning of your dart legs. Continue tracing the center front of piece A from point B1 to the neckline and along the neckline until you meet the neckline of piece B. The extension that is used in piece A is ignored when creating piece B. You will extend the waistline 8.5 cm. This creates the overlap at center front. Draw this line upwards and parallel until you reach the neckline of piece B. From this point you will create the extension for the scarf. You will use the beginning of the dart leg closest to the center front on pattern piece B and the center front neckline (after the extension) and draw lines upward parallel to each other and 80 cm long. This is your right front pattern piece.
 |  |
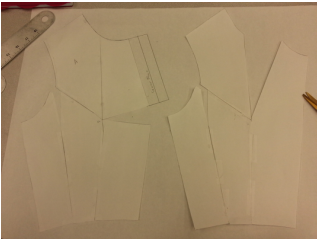
Next you will draft your collar. These measurements were very self-explanatory. Nackamichi did not clarify whether she made a facing and upper collar, but in the picture there is clearly a facing and upper collar. I went ahead and created the facing and collar to assure my garment would had a finished look. The garment was relatively easy to sew in terms of construction steps. The only step that tripped me up was the make-shift dart that comes from the center front neckline and goes to the bust of the right front piece. I determined she meant to include that for contouring purposes. This pattern used some dart manipulation. Nackamichi wanted to make sure to include darts and contouring so that the scarf fullness would be emphasized. I think she has a different opinion on adding fullness. In the patterns I have completed she isn’t adding fullness to alter the silhouette, but she is adding fullness to create 3D shape. The extension she has added to this pattern is fullness but it does not alter the shape it is simply a rectangular extension that is wrapped around the neck to create the illusion of a scarf. Nackamichi keeps all dart rules in mind, although she does seem to slash and spread in pretty uncommon places, such as center front. No rules of traditional patternmaking are broken with this pattern and the finished garment has very good fit.
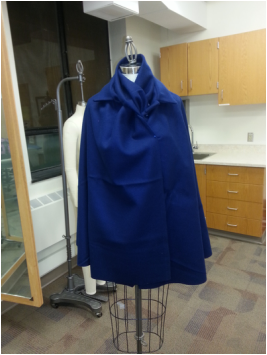
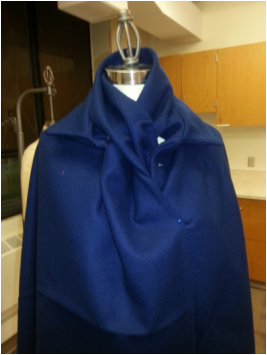
For my perspective on this technique I contemplated different areas where I could incorporate this vanishing scarf. I was thinking about including it on the skirt and had the pattern started and realized that, functionally, this technique would not work in a skirt pattern unless something else was added, such as an invisible closure. The extension is meant to be a decorative element and by incorporating it into the skirt it would have to become a functional waistband. With the opening of the blouse that Nackamichi introduced at the center front it is ideal because the weight of the garment is carried on the shoulders. I tried to think of possible garments where the weight is carried another place other than the opening. I could not determine a garment other than one that opens that the neckline. I decided to make a cape/shawl that incorporated this vanishing scarf. It would be very handy for your overcoat or cape to incorporate a scarf on cold days. This pattern was relatively the same as the blouse. The dart at the center front neckline of piece A and the center front dart at piece B remained the same. I used a thicker material because I wanted to see what the drape would look like in a wool fabric with the bulk of the extension. I also manipulated the extension in length from 80cm to 120cm. The finished garment turned out extremely pleasing. The cape with the vanishing scarf is definitely something that could be appealing in a mass market. Although it has a very appealing finished look the pattern pieces are highly unreasonable on the mass production scale. With the extension taking up 120cm, not including the length of the cape it makes for a lot of surface area.
 |  |
 |  |
 RSS Feed
